

smartskip智能跳绳软件
15.27MB · 2025-12-21

import { ref, effect } from '../dist/reactivity.esm.js'
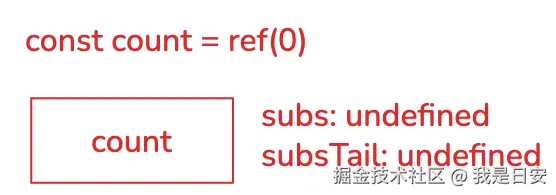
const count = ref(0)
effect(() => {
console.log('effect1', count.value)
})
effect(() => {
console.log('effect2', count.value)
})
setTimeout(() => {
count.value = 1
}, 1000)
昨天,我们了解了链表的核心概念,现在要把这些概念结合起来。
首先让我们从一个常见的场景开始:当一个响应式数据 (ref) 同时被多个 effect 依赖时,会发生什么?
我们预期它会输出如下:
console.log('effect1', 0)
console.log('effect2', 0)
// 1秒后
console.log('effect1', 1)
console.log('effect2', 1)
但实际上我们得到的是:
console.log('effect1', 0)
console.log('effect2', 0)
// 1秒后
console.log('effect2', 1)
结果很明显:我们上次的 ref 实现,只能让 this.subs 属性一次记住一个订阅者,导致后来的 effect 覆盖了前面的。这会造成以下问题:
effect 订阅时,会覆盖掉前一个。effect 能收到更新通知。get value(){
if(activeSub){
this.subs = activeSub
}
return this._value
}
effect 加入执行 console.log('effect1', 0)
收集依赖 effect(fn1),此时 activeSub = fn1,然后立即执行 fn1()。
fn1 读取 count.value → 进入 getter:
activeSub 存在 → this.subs = activeSub (把 subs 指向 fn1)。0,所以打印出 effect1 0。effect(fn1) 结束,把 activeSub 清空为 undefined。
effect 加入执行 console.log('effect2', 0)
收集依赖 effect(fn2),此时 activeSub = fn2,并执行 fn2()。
fn2 读取 count.value → 进入 getter:
activeSub 存在 → this.subs = activeSub 覆盖掉 fn1,现在 subs === fn2。0,打印出 effect2 0。effect(fn2) 结束,把 activeSub 清空为 undefined。
set value(newValue){
    this._value = newValue
    this.subs?.()
  }
count.value = 1。this._value = 1。this.subs?.() → 直接调用当前存在于 subs 的函数 fn2。fn2 被调用,所以只打印出 console.log('effect2', 1)。接下来我们运用上次讲的双向链表,来处理订阅者被覆盖的问题:
// ref.ts

// 定义链表节点结构
interface Link {
  // 保存 effect
  sub: Function
  // 下一个节点
  nextSub: Link
  // 上一个节点
  prevSub: Link
}

class RefImpl {
  _value;
  [ReactiveFlags.IS_REF] = true

  subs: Link // 订阅者链表的头节点
  subsTail: Link // 订阅者链表的尾节点

  constructor(value){
    this._value = value
  }

  get value(){
    if(activeSub){
      // 创建节点
      const newLink: Link = {
        sub: activeSub,
        nextSub: undefined,
        prevSub: undefined
      }

    /**
      * 关联链表关系
      * 1. 如果存在尾节点,表示链表中已有节点,在链表尾部新增。
      * 2. 如果不存在尾节点,表示这是第一次关联链表,第一个节点既是头节点也是尾节点。
      */
      if(this.subsTail){
        this.subsTail.nextSub = newLink
        newLink.prevSub = this.subsTail
        this.subsTail = newLink
      } else {
        this.subs = newLink
        this.subsTail = newLink
      }
    }
    return this._value
  }

  set value(newValue){
    this._value = newValue

    // 获取头节点
    let link = this.subs
    let queuedEffect = []

    // 遍历整个链表的每一个节点
    // 把每个节点里的 effect 函数放进数组
    // 注意不是放入节点本身,而是放入节点里的 sub 属性(即 effect 函数)
    while (link){
      queuedEffect.push(link.sub)
      link = link.nextSub
    }

    // 触发更新
    queuedEffect.forEach(effect => effect())
  }
}
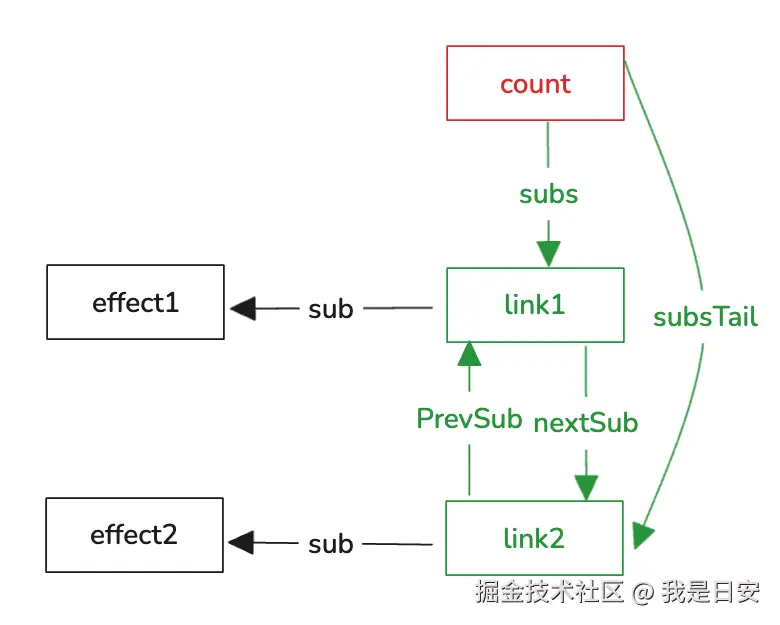
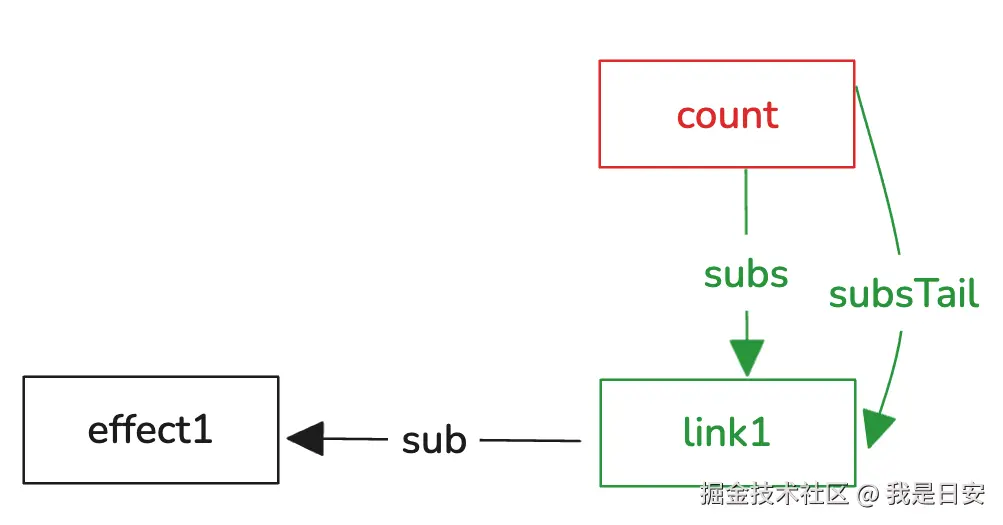
effect 之前,头尾节点都是 undefined。effect 加入effect(fn1) 访问 count。
activeSub = effect1,立即执行 effect1()。
effect1 读取 count.value → 进入 get:
activeSub 存在 → 创建 newLink(effect1)。subsTail 为 undefined,所以把头节点和尾节点都指向 newLink(effect1)。输出 effect1 0。
清除 activeSub:activeSub = undefined。
effect 加入effect(fn2) 访问 count。
activeSub = effect2,执行 effect2()。
effect2 读取 count.value → 触发 getter:
activeSub 存在 → 创建 newLink(effect2)。
这次 subsTail 存在 (指向 effect1 的节点),所以把 newLink(effect2) 挂在尾端:
effect1 节点的 nextSub 指向 effect2 节点。effect2 节点的 prevSub 指向 effect1 节点。subsTail 更新为 effect2 节点。输出 effect2 0。
清除 activeSub:activeSub = undefined。
执行 count.value = 1。
触发 setter,this._value = 1。
从头节点开始遍历链表,把每个节点的 sub (也就是 effect 函数) 放入 queuedEffect 数组:
effect1,再推入 effect2。queuedEffect.forEach(fn => fn()) 依次执行:
effect1() → 打印 effect1 1。effect2() → 打印 effect2 1。想了解更多 Vue 的相关知识,抖音、B站搜索我师父「远方os」,一起跟日安当同学。
15.27MB · 2025-12-21
40.05MB · 2025-12-21
50.79MB · 2025-12-21

