消除迷宫:异境入侵官方中文版
· 2025-11-02

SpringBoot是基于Spring4.0设计的java系统框架,为了帮助开发者更容易的创建基于Spring的应用程序和服务。
它遵循"约定优先于配置"的原则, 使用SpringBoot只需很少的配置,大部分的时候直接使用默认的配置即可。
从spring4.0推出的
官网:https://*spr*ing*.io/projects/spring-boot#learn
官网查看:
https://docs.spr**in*g.io/spring-boot/docs/2.1.0.RELEASE/reference/htmlsingle/#getting-started-system-requirements
其他版本修改对应版本号就可以
| springboot2.1X | jdk8+、maven3.3+、Tomcat8+、Spring Framework5.1.x |
| springboot2.0X | jdk8+、maven3.2+、Tomcat8+、Spring Framework5.0.x |
| Spring Boot 1.5.x | jdk7+、maven3.2+、Tomcat7+、Spring Framework4.3.x |
默认的springboot使用内置的tomcat通过运行jar项目进行启动
我们可以做出一定的修改使用外部的tomcat并发布成war项目进行启动
IDE方式:开发环境通过开发工具进行启动
jar/war启动:导出jar或war包放到服务器进行启动
maven插件方式:使用maven命令进行启动
web方式:通过官网创建下载再导入
https://start.*spr**ing.io/
在Spring Tool Suite里创建Spring Boot项目
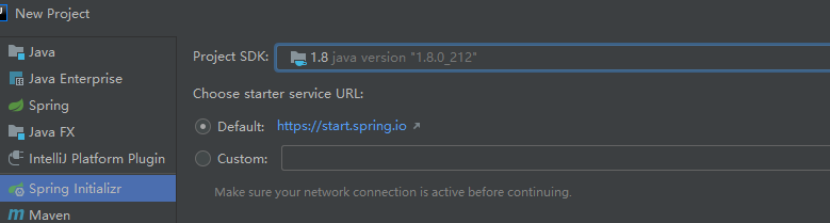
在IntelliJ IDEA里创建Spring Boot项目
IntelliJ IDEA是非常流行的IDE,IntelliJ IDEA 14.1就开始支持Spring Boot了。
要在IntelliJ IDEA里创建新的Spring Boot应用程序,在File菜单里选择New > Project >Spring Initializr。
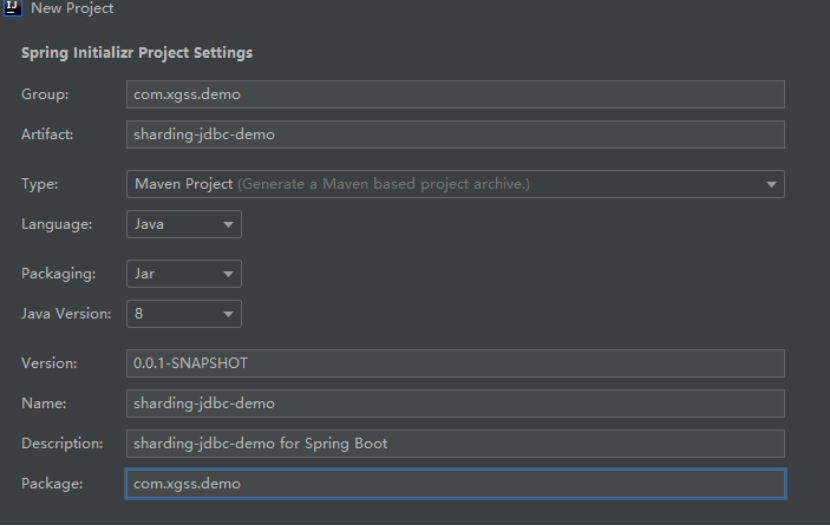
选择要加入的依赖
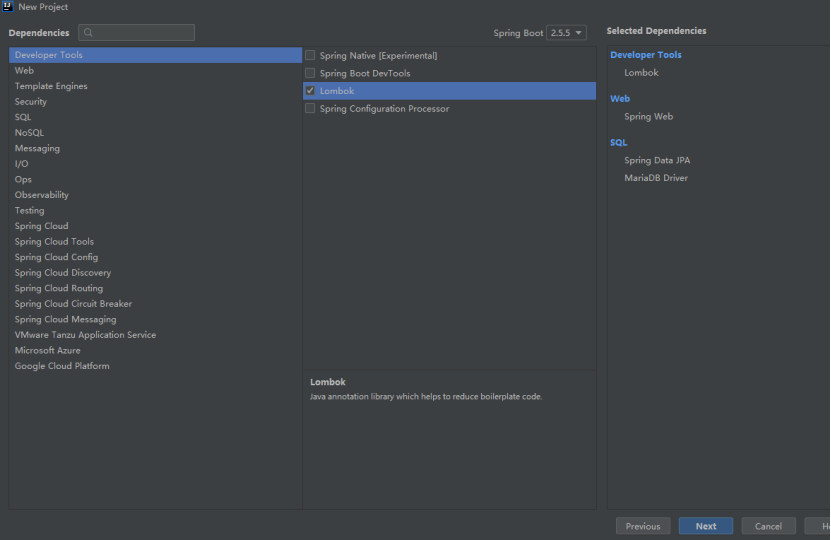
设置项目名称Project name 和 工程保存路径 Project location
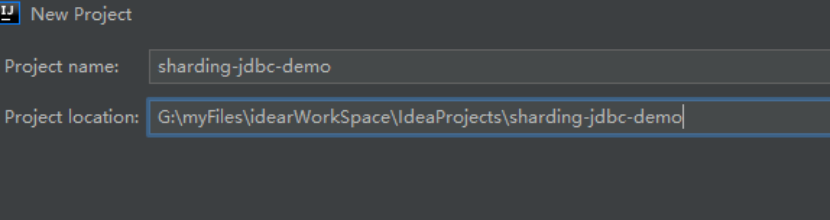
创建完成后进行配置maven加入其它依赖等
Spring Boot建议使用Maven或Gradle,本文以Maven为例。
pom.xml
<project xmlns="http://maven.**apa*che.org/POM/4.0.0" xmlns:xsi="http://www.***w3.org/2001/XMLSchema-instance"
  xsi:schemaLocation="http://maven.**apa*che.org/POM/4.0.0 http://maven.ap*a*c*he.org/xsd/maven-4.0.0.xsd">
  <modelVersion>4.0.0</modelVersion>

  <groupId>com.springboot.xgss</groupId>
  <artifactId>spring-boot</artifactId>
  <version>0.0.1-SNAPSHOT</version>
  <packaging>jar</packaging>

  <name>spring-boot</name>
  <url>http://maven.ap*ac*h*e.org</url>

  <properties>
    <project.build.sourceEncoding>UTF-8</project.build.sourceEncoding>
    <!-- Spring默认使用jdk1.6,如果想用1.7可以在这里配置 -->
    <java.version>1.7</java.version>
  </properties>

 <parent>
        <groupId>org.springframework.boot</groupId>
        <artifactId>spring-boot-starter-parent</artifactId>
        <version>1.3.0.RELEASE</version>
    </parent>

<!-- 使用父pom虽然简单,但是有些情况我们已经有父pom,不能直接增加<parent>时,可以通过如下方式: -->
<!-- <dependencyManagement>
     <dependencies>
        <dependency>
            <groupId>org.springframework.boot</groupId>
            <artifactId>spring-boot-dependencies</artifactId>
            <version>1.2.3.RELEASE</version>
            <type>pom</type>
            <scope>import</scope>
        </dependency>
    </dependencies>
</dependencyManagement> -->
<!--  这里实现web功能所以用这个包-->
    <dependencies>
        <dependency>
            <groupId>org.springframework.boot</groupId>
            <artifactId>spring-boot-starter-web</artifactId>
        </dependency>
    </dependencies>

    <build>
        <plugins>
        <!-- 该插件支持多种功能,常用的有两种,第一种是打包项目为可执行的jar包。在项目根目录下执行mvn package将会生成一个可执行的jar包,jar包中包含了所有依赖的jar包
       	 生成这个可执行的jar包后,在命令行执行java -jar xxxx.jar即可启动项目。另外一个命令就是mvn spring-boot:run,可以直接使用tomcat(默认)启动项目。
         -->
            <plugin>
                <groupId>org.springframework.boot</groupId>
                <artifactId>spring-boot-maven-plugin</artifactId>
                <dependencies>
                <!--  为了避免重复启动项目,我们可以启用热部署,Spring-Loaded项目提供了强大的热部署功能,添加/删除/修改 方法/字段/接口/枚举 等代码的时候都可以热部署
               		 通过mvn spring-boot:run启动就支持热部署了。使用热部署的时候,需要IDE编译类后才能生效,你可以打开自动编译功能,这样在你保存修改的时候,类就自动重新加载了。
                -->
                    <dependency>
                        <groupId>org.springframework</groupId>
                        <artifactId>springloaded</artifactId>
                        <version>1.2.5.RELEASE</version>
                    </dependency>
                </dependencies>
            </plugin>
        </plugins>
    </build>
</project>
编写应用类
Application.java
@RestController
@EnableAutoConfiguration
public class Application {

    @RequestMapping("/")
    String home() {
        return "Hello World!";
    }

    @RequestMapping("/now")
    String hehe() {
        return "现在时间:" + (new Date()).toLocaleString();
    }

    public static void main(String[] args) {
        SpringApplication.run(Application.class, args);
    }

}
访问
右键main方法选择
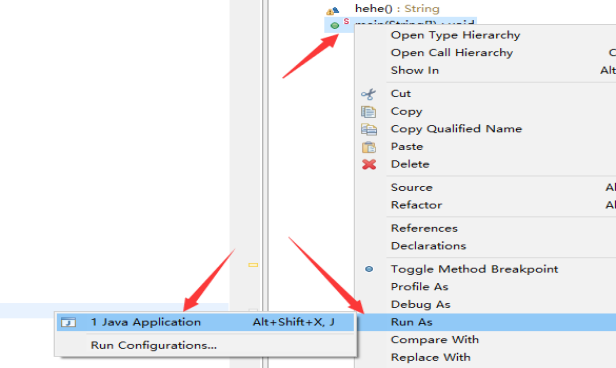
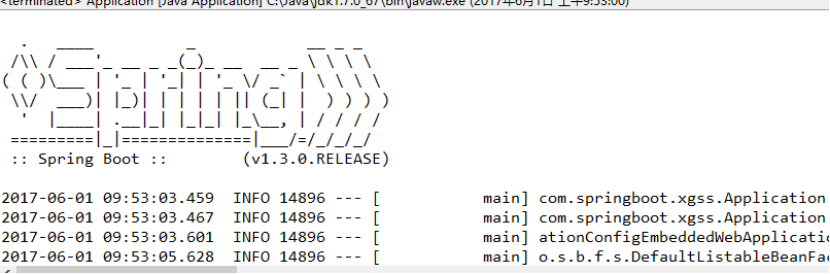
在IDE中直接直接执行main方法,然后访问http://localhost:8080即可。
另外还可以用上面提到的mvn,可以打包为可执行jar包,然后执行java -jar xxx.jar。
或者执行mvn spring-boot:run运行项目。

是否是必须的:不是必须的,通过以下方式替代其功能:
使用 spring-boot-dependencies 的 import 模式(推荐)
<dependencyManagement>
    <dependencies>
        <dependency>
            <groupId>org.springframework.boot</groupId>
            <artifactId>spring-boot-dependencies</artifactId>
            <version>3.1.5</version>
            <scope>import</scope>
            <type>pom</type>
        </dependency>
    </dependencies>
</dependencyManagement>
这种方式只引入依赖版本管理,不继承父项目的其他配置(如插件等),适合你已有自己的父 POM 或想更灵活控制构建流程。
如果不用 parent,还需要手动添加哪些内容?
插件配置(Maven):
<build>
    <plugins>
        <plugin>
            <groupId>org.apache.maven.plugins</groupId>
            <artifactId>maven-compiler-plugin</artifactId>
            <configuration>
                <source>17</source>
                <target>17</target>
            </configuration>
        </plugin>
        <plugin>
            <groupId>org.springframework.boot</groupId>
            <artifactId>spring-boot-maven-plugin</artifactId>
            <executions>
                <execution>
                    <goals>
                        <goal>repackage</goal>
                    </goals>
                </execution>
            </executions>
        </plugin>
    </plugins>
</build>J2EE的整体整合解决方案和自动配置都在spring-boot-autoconfigure.jar;该包中定义了很多场景的配置类
每一个这样的 xxxAutoConfiguration类都会完成各自的自动化配置
会从配置文件中获取指定key的值映射到xxxProperties类中
因为我们例子是写一个web应用,因此写的这个注解,这个注解相当于同时添加@Controller和@ResponseBody注解。
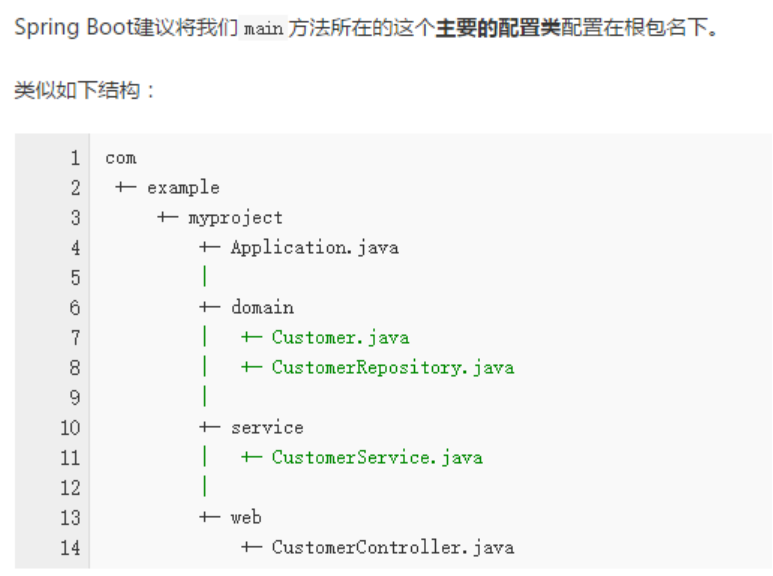
Spring Boot建议只有一个带有该注解的类。
@EnableAutoConfiguration作用:Spring Boot会自动根据你jar包的依赖来自动配置项目。例如当你项目下面有HSQLDB的依赖时,Spring Boot会创建默认的内存数据库的数据源DataSource,如果你自己创建了DataSource,Spring Boot就不会创建默认的DataSource。
如果你不想让Spring Boot自动创建,你可以配置注解的exclude属性,例如:

由于大量项目都会在主要的配置类上添加@Configuration,@EnableAutoConfiguration,@ComponentScan三个注解。
因此Spring Boot提供了@SpringBootApplication注解,该注解可以替代上面三个注解(使用Spring注解继承实现)。
spring Boot 允许通过外部配置让你在不同的环境使用同一应用程序的代码,简单说就是可以通过配置文件来注入属性或者修改默认的配置。
spring会从classpath下的/config目录或者classpath的根目录查找application.properties或application.yml。
/config优先于classpath根目录
这些方式优先级如下:
命令行参数
来自java:comp/env的JNDI属性
Java系统属性(System.getProperties())
操作系统环境变量
RandomValuePropertySource配置的random.*属性值
jar包外部的application-{profile}.properties或application.yml(带spring.profile)配置文件
jar包内部的application.properties或application.yml(不带spring.profile)配置文件
@Configuration注解类上的@PropertySource
通过SpringApplication.setDefaultProperties指定的默认属性
通过Java -jar app.jar --name="Spring" --server.port=9090方式来传递参数。
参数用--xxx=xxx的形式传递。
注意:命令行参数在app.jar的后面!
可以使用的参数可以是我们自己定义的,也可以是Spring Boot中默认的参数。
很多人可能会关心如web端口如何配置这样的问题,这些都是Spring Boot中提供的参数,部分可用参数如下:
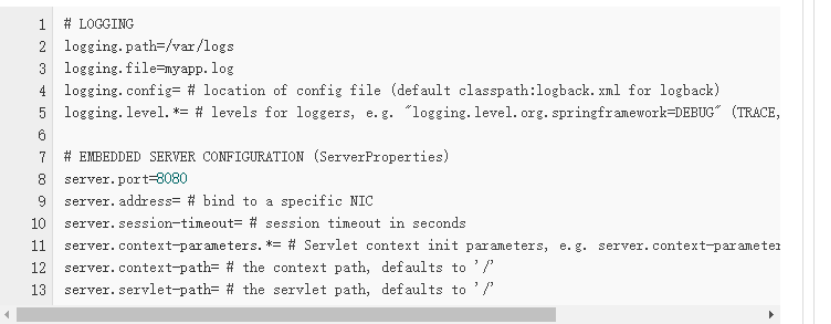
跟多的默认配置参考:
可以通过SpringApplication.setAddCommandLineProperties(false)禁用命令行配置。
注意Java系统属性位置java -Dname="isea533" -jar app.jar,可以配置的属性都是一样的,优先级不同。
例如java -Dname="isea533" -jar app.jar --name="Spring!"中name值为Spring!
配置过JAVA_HOME的应该都了解这一个。
这里需要注意的地方,有些OS可以不支持使用.这种名字,如server.port,这种情况可以使用SERVER_PORT来配置。
具体名字如何匹配,看本文后面。
系统中用到随机数的地方,例如:
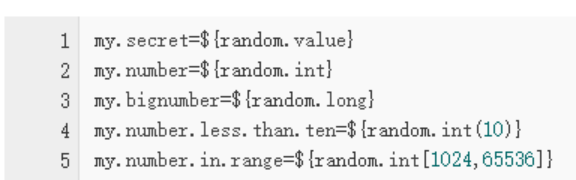
random.int*支持value参数和,max参数,当提供max参数的时候,value就是最小值。
在配置文件中直接写:

.yml格式的配置文件如:
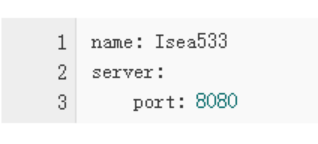
当有前缀的情况下,使用.yml格式的配置文件更简单。关于.yml配置文件用法请看:
注意:使用.yml时,属性名的值和冒号中间必须有空格,如name: Isea533正确,name:Isea533就是错的。
这个注解可以指定具体的属性配置文件,优先级比较低。
例如:
SpringApplication application = new SpringApplication(Application.class);
Map<String, Object> defaultMap = new HashMap<String, Object>();
defaultMap.put("name", "Isea-Blog");
//还可以是Properties对象
application.setDefaultProperties(defaultMap);
application.run(args);@Value获取值和@ConfigurationProperties获取值比较
|
|
@ConfigurationProperties |
@Value |
|
功能 |
批量注入配置文件中的属性 |
一个个指定 |
|
松散绑定(松散语法) |
支持 |
不支持 |
|
SpEL |
不支持 |
支持 |
|
JSR303数据校验 |
支持 |
不支持 |
|
复杂类型封装 |
支持 |
不支持 |
这种方式是最简单的,通过@Value注解可以将属性值注入进来。
Spring Boot 可以方便的将属性注入到一个配置对象中。例如:
my.name=Isea533
my.port=8080
my.servers[0]=dev.bar.com
my.servers[1]=foo.bar.com
对应对象:
@ConfigurationProperties(prefix="my")
public class Config {
    private String name;
    private Integer port;
    private List<String> servers = new ArrayList<String>();

    public String geName(){
        return this.name;
    }

    public Integer gePort(){
        return this.port;
    }
    public List<String> getServers() {
        return this.servers;
    }
}
pring Boot 会自动将prefix="my"前缀为my的属性注入进来。
Spring Boot 会自动转换类型,当使用List的时候需要注意在配置中对List进行初始化!
Spring Boot 还支持嵌套属性注入,例如:
name=isea533
jdbc.username=root
jdbc.password=root
...
对应的配置类:
@ConfigurationProperties
public class Config {
    private String name;
    private Jdbc jdbc;
    class Jdbc {
        private String username;
        private String password;
        //getter...
    }

    public Integer gePort(){
        return this.port;
    }
    public Jdbc getJdbc() {
        return this.jdbc;
    }
}
dbc开头的属性都会注入到Jdbc对象中。
例如:
@ConfigurationProperties(prefix = "foo")
@Bean
public FooComponent fooComponent() {
    ...
}
Spring Boot 会将foo开头的属性按照名字匹配注入到FooComponent对象中。
例如:
app.name=MyApp
app.description=${app.name} is a Spring Boot application
可以在配置文件中引用前面配置过的属性(优先级前面配置过的这里都能用)。
通过如${app.name:默认名称}方法还可以设置默认值,当找不到引用的属性时,会使用默认的属性。
由于${}方式会被Maven处理。如果你pom继承的spring-boot-starter-parent,Spring Boot 已经将maven-resources-plugins默认的${}方式改为了@ @方式,例如@name@。
如果你是引入的Spring Boot,你可以修改使用其他的分隔符:
例如修改web默认端口需要使用--server.port=9090方式,如果在配置中写上:
server.port=${port:8080}那么就可以使用更短的--port=9090,当不提供该参数的时候使用默认值8080。
例如有如下配置对象:
@Component
@ConfigurationProperties(prefix="person")
public class ConnectionSettings {

    private String firstName;

}
firstName可以使用的属性名如下:
person.firstName,标准的驼峰式命名
person.first-name,虚线(-)分割方式,推荐在.properties和.yml配置文件中使用
PERSON_FIRST_NAME,大写下划线形式,建议在系统环境变量中使用
可以使用JSR-303注解进行验证,例如:
	@Component
	@ConfigurationProperties(prefix="connection")
	public class ConnectionSettings {

	    @NotNull
	    private InetAddress remoteAddress;

	    // ... getters and setters

}默认情况下spring boot 启动会扫描以下位置的application.properties或者application.yml文件作为Spring boot的默认配置文件
–file:./config/
–file:./
–classpath:/config/
–classpath:/
以上是按照优先级从高到低的顺序,所有位置的文件都会被加载,高优先级配置内容会覆盖低优先级配置内容。如果高优先级中配置文件属性与低优先级配置文件不冲突的属性,则会共同存在—互补配置。
加载自定义配置文件
自定义的xxx.properties配置文件是不会被SpringBoot自动加载的,需要手动去进行加载,这里的手动加载一般指的是注解的方式加载,这里就涉及到我们今天的重点之一:加载自定义属性文件的注解:@PropertySource("classpath:xxx.properties"),这个注解专门用来加载指定位置的properties文件,Spring暂未提供加载指定位置yml文件的注解
test.properties
test.name=chen
test.age=22
@Component
@ConfigurationProperties(prefix = "test")
@PropertySource(value = "classpath:test.properties")
public class Test {
String name;
String age;
...
}@PropertySource注解说明:
加载指定的属性文件(*.properties)到 Spring 的 Environment 中。可以配合 @Value 和 @ConfigurationProperties 使用。
@PropertySource 和 @Value 组合使用,可以将自定义属性文件中的属性变量值注入到当前类的使用@Value注解的成员变量中。
@PropertySource 和 @ConfigurationProperties 组合使用,可以将属性文件与一个Java类绑定,将属性文件中的变量值注入到该Java类的成员变量中。
通常与@Configuration一起搭配使用
创建各种环境配置文件
application-dev.properties:开发环境
application-test.properties:测试环境
application-prod.properties:生产环境
在application.properties 中通过spring.profiles.active={profile}来设置加载对应的环境配置文件
spring.profiles.active=prod
import java.util.List;
import org.assertj.core.util.DateUtil;
import org.junit.Test;
import org.junit.runner.RunWith;
import org.springframework.beans.factory.annotation.Autowired;
import org.springframework.boot.test.context.SpringBootTest;
import org.springframework.test.context.junit4.SpringRunner;
import com.xgss.XgssApplication;
import com.xgss.project.statistics.overall.domain.AgentOrderCountQueryVo;
import com.xgss.project.statistics.overall.domain.OverAllOrderVo;
import com.xgss.project.statistics.overall.service.IOverAllService;
@RunWith(SpringRunner.class)
@SpringBootTest(classes = XgssApplication.class)
public class XgssAgentTest1 {
	@Autowired
	private IOverAllService overAllService;
	@Test
	public void test1(){
		AgentOrderCountQueryVo vo=new AgentOrderCountQueryVo();
		vo.setStartTime(DateUtil.parseDatetime("2019-06-01T00:00:00"));
		vo.setEndTime(DateUtil.parseDatetime("2019-06-18T00:00:00"));
		List<OverAllOrderVo> findOverAllList = overAllService.findOverAllList(vo);
		System.out.println(findOverAllList.size());
	}
}测试类上加上注解@RunWith(SpringRunner.class),@SpringBootTest(classes = DongaoApplication.class),其中DongaoApplication是自定义的SpringBoot的主配置类
说明:配置文件中的属性对应了类中的属性,属性是按照驼峰形式命名,配置文件要转化一下:
如类属性名称contextPath,配置文件中context-path
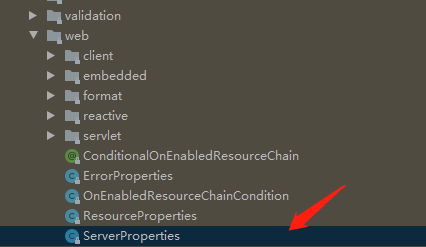
server的配置对应的是ServerProperties类
该类上有这注解标明配置文件使用名称server就可以,对于多余的配置忽略
@ConfigurationProperties(prefix = "server", ignoreUnknownFields = true)
属性说明
|
port |
服务访问端口 |
|
|
address |
服务器绑定的地址 |
|
| servlet.context-path | 应用的上下文路径,也可以称为项目路径 |
ServerProperties类中有ssl类型的属性
Servlet类为ServerProperties类的静态内部类
contextPath 应用的上下文路径,也可以称为项目路径
如果context-path = “/myapp”, 请求的url地址就是 localhost : port/myapp进行项目访问
加入依赖,记得加入版本
<dependency>
     <groupId>org.springframework.boot</groupId>
     <artifactId>spring-boot-starter-web</artifactId>
</dependency>内嵌的方便
外置的一个tomcat可以部署多个war包
因为现在主要的部署环境是微服务和云部署,Spring Boot就是面向微服务架构和云考虑的。打成一个可执行Jar最方便。
server:
# tomcat 配置
  tomcat:
    # 接收队列长度
    accept-count: 1000
    # 最小空闲线程数
    min-spare-threads: 100
    # POST请求提交大小
    max-http-form-post-size: 50MB
    # 最大链接数
    max-connections: 1000
    # 最大线程数
    max-threads: 400
    #编码方式
    uri-encoding: UTF-8
    #链接建立超时时间
    connection-timeout: 10000
    #日志配配置
    accesslog:
      #是否启用
      enabled: true
      #目录
      directory: C:logstomcat${server.port}
      #文件日期格式
      file-date-format: yyyy-MM-dd
      #前缀
      prefix: access_log
      #后缀
      suffix: .log
      #日志格式,默认为common,也可自定义配置
pattern: combinedtomcat的配置对应的spring-boot-autoconfigure包中web包下的ServerProperties类的静态内部类Tomcat
Tomcat拥有如下属性(不同版本的包可能不同,如下为2.3.2.Reelease.jar)
|
maxThreads 最大工作线程数,默认200 minSpareThreads 最小工作线程数,默认10 maxHttpHeaderSize HTTP消息头的最大值(以kb为单位),默认8kb maxHttpPostSize HTTP POST内容最大值,默认-1代表不限制 maxSwallowSize requestbody最大值,默认2m internalProxies 受信任IP校验正则表达式 protocolHeader 协议头,通常设置为X-Forwarded-Proto,无默认值 protocolHeaderHttpsValue 协议头的内容,判断是否使用了SSL,默认值是https portHeader 用于覆盖原始端口值的HTTP头的名称,默认为X-Forwarded-Port redirectContextRoot 对上下文根的请求是否应该通过附加/到路径来重定向,默认是true useRelativeRedirects 设置通过调用sendRedirect生成的HTTP 1.1和后面的位置头是使用相对重定向还是使用绝对重定向,没有默认值 remoteIpHeader 提取远程IP的HTTP头的名称。例如X-FORWARDED-FOR,无默认值 maxConnections 最大连接数,如果一旦连接数到达,剩下的连接将会保存到请求缓存队列里,也就是accept-count指定队列,默认8192 acceptCount 连接请求的队列长度默认100 uriEncoding url的编码方式,默认utf-8 |
Tomcat有一个静态内部类Accesslog,有如下属性
|
enabled 是否启用访问日志,默认为false pattern 访问日志的格式化模式,默认为common directory 创建日志文件的目录。可以是绝对的或相对于Tomcat的基目录,默认是logs prefix 日志文件名称前缀,默认为access_log suffix 日志文件名称后缀,默认为.log rotate 是否启用访问日志旋转,默认为true renameOnRotate 是否推迟将日期戳包含在文件名中直到旋转时间。 fileDateFormat 日志文件名称中的日期格式,默认为.yyyy-MM-dd。 requestAttributesEnabled 为请求使用的IP地址、主机名、协议和端口设置请求属性。默认为false buffered 是否缓冲输出,使其只定期刷新,默认为true |
Tomcat还有名为Resource的静态内部类,主要用于配置静态资源缓存的生存周期
刚创建好的SpringBoot项目,默认给我们提供了内置的Tomcat,只要运行Application 就可以启动项目了
如果不使用内置的tomcat,我们可以做出如下修改
1、修改打包形式
<packaging>war</packaging>
2、移除嵌入式tomcat插件
<dependency>
    <groupId>org.springframework.boot</groupId>
    <artifactId>spring-boot-starter-web</artifactId>
    <!-- 移除嵌入式tomcat插件 -->
    <exclusions>
        <exclusion>
            <groupId>org.springframework.boot</groupId>
            <artifactId>spring-boot-starter-tomcat</artifactId>
        </exclusion>
    </exclusions>
</dependency>
3、添加servlet-api的依赖
<!-- servlet -->
<dependency>
    <groupId>javax.servlet</groupId>
    <artifactId>jstl</artifactId>
</dependency>
4、启动类
@SpringBootApplication
public class Application {
    public static void main(String[] args) {
        SpringApplication.run(Application.class, args);
    }
}
5、SpringBootStartApplication
/**
     * 使用内嵌的tomcat时SpringbootdemoApplication的main方法启动的方式
     这里需要类似于web.xml的配置方式来启动spring上下文,因此重写SpringBootServletInitializer的configure方法,在Application类的同级添加一个SpringBootStartApplication类
     */

public class ScfManagerWebStartApplication extends SpringBootServletInitializer {
    @Override
    protected SpringApplicationBuilder configure(SpringApplicationBuilder builder) {
        // 注意这里要指向原先用main方法执行的Application启动类
        return builder.sources(Application.class);
    }
}调优的方式是,在项目启动的时候指定jvm参数
SpringBoot应用标注在某个类上,用于快捷配置启动类。可配置多个启动类,但启动时需选择以哪个类作为启动类来启动项目。
此注解等同于@Configuration+@EnableAutoConfiguration+@ComponentScan的合集
@Configuration的注解类标识这个类可使用Spring IoC容器作为bean定义的来源。
@Configuration对比@Component
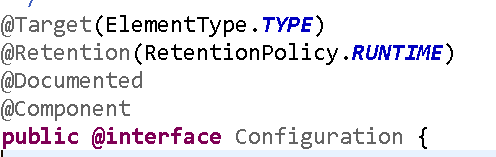
@Configuration注解中包含了@Component
从定义来看, @Configuration 注解本质上还是 @Component,因此 <context:component-scan/> 或者 @ComponentScan 都能处理@Configuration 注解的类。
@Configuration注解一般注解在这样的类上:这个类里面有@Value注解的成员变量和@Bean注解的方法,就是一个配置类。
@Configuration注解的类中使用@Bean注解的方法都会被动态代理,因此调用该方法返回的都是同一个实例。
@Component注解的类中使用@Bean注解的方法,不会被动态代理,因此调用该方法都会new一个新的实例。
@Configuration 标记的类必须符合下面的要求:
配置类必须以类的形式提供(不能是工厂方法返回的实例),允许通过生成子类在运行时增强(cglib 动态代理)。
配置类不能是 final 类(没法动态代理)。
配置注解通常为了通过 @Bean 注解生成 Spring 容器管理的类,
配置类必须是非本地的(即不能在方法中声明,不能是 private)。
任何嵌套配置类都必须声明为static。
@Bean 方法可能不会反过来创建进一步的配置类(也就是返回的 bean 如果带有 @Configuration,也不会被特殊处理,只会作为普通的 bean)。
加载过程
Spring 容器在启动时,会加载默认的一些 PostPRocessor,其中就有 ConfigurationClassPostProcessor,这个后置处理程序专门处理带有 @Configuration 注解的类,这个程序会在 bean 定义加载完成后,在 bean 初始化前进行处理。主要处理的过程就是使用 cglib 动态代理增强类,而且是对其中带有 @Bean 注解的方法进行处理
@ConfigurationProperties是springboot提供读取配置文件的一个注解。
@ConfigurationProperties的作用是将配置文件转换成类对象,便于修改或者获取值。
@EnableConfigurationProperties的作用是使使用 @ConfigurationProperties 注解的类生效。该类会被加入到IOC容器且属性被赋值上了配置文件中配置的值
使用了@EnableConfigurationProperties就可以不用在@ConfigurationProperties 注解的类上添加@Component或@Configuration注解了
属性说明:
| prefix/value | 指定哪些外部属性将绑定到类的字段上,默认为”” |
| ignoreUnknownFields | 忽略配置文件中配置的类中没有的属性,默认为true |
| ignoreInvalidFields | 忽略非法的字段值绑定,默认为false |
使用例子:
connection.username=admin
connection.password=kyjufskifas2jsfs
connection.remoteAddress=192.168.1.1
@Component
@ConfigurationProperties(prefix = "connection")
public class ConnectionSettings {
private String username;
private String remoteAddress;
private String password ;
public String getUsername() {
return username;
}
public void setUsername(String username) {
this.username = username;
}
public String getRemoteAddress() {
return remoteAddress;
}
public void setRemoteAddress(String remoteAddress) {
this.remoteAddress = remoteAddress;
}
public String getPassword() {
return password;
}
public void setPassword(String password) {
this.password = password;
}
}也可以:
把@ConfigurationProperties还可以直接定义在@bean的注解上,这是bean实体类就不用@Component和@ConfigurationProperties了
@SpringBootApplication
public class DemoApplication{

    @Bean
    @ConfigurationProperties(prefix = "connection")
    public ConnectionSettings connectionSettings(){
        return new ConnectionSettings();

    }

    public static void main(String[] args) {
        SpringApplication.run(DemoApplication.class, args);
    }
}
然后我们需要使用的时候就直接这样子注入
@Autowired
ConnectionSettings conn;
根据类路径中jar包是否存在来决定是否开启某一个功能的自动配置。
会自动扫描指定包下全部标有@Component的类,并注册成bean,当然包括@Component下的子注解:@Service,@Repository,@Controller;默认会扫描当前包和所有子包。
启动类如果放在根目录下,启动类上只有注解@SpringBootApplication;
如果启动类在某个包下,需要在启动类中增加注解@ComponentScan,配置需要扫描的包名;
原因:当启动springboot时@SpringBootApplication注解会去自动扫描当前目录和其子目录
SpringBoot支持如下页面模板语言
上面并没有列举所有SpringBoot支持的页面模板技术。其中Thymeleaf是SpringBoot官方所推荐使用的
Spring Boot默认存放模板页面的路径在src/main/resources/templates或者src/main/view/templates,这个无论是使用什么模板语言都一样,当然默认路径是可以自定义的,不过一般不推荐这样做。
配置方式:
使用@WebFilter+@ServletComponentScan注解方式
自定义配置类注册过滤器方式
@WebFilter使用说明:
在filter类上添加注解,filterName指明filter名称,urlPatterns指明要过滤的地址
@WebFilter(filterName = "myFilter1", urlPatterns = "/*")
public class MyFilter1 implements Filter {
    @Override
    public void init(FilterConfig filterConfig) throws ServletException {
        log.info(filterConfig.getFilterName() + " init");
    }

    @Override
    public void doFilter(ServletRequest request, ServletResponse response, FilterChain chain) {
        log.info("myFilter1 begin");
    }

    @Override
    public void destroy() {
    }
}
启动类添加@ServletComponentScan注解,@ServletComponentScan注解所扫描的包路径必须包含该Filter
@SpringBootApplication
@ServletComponentScan(basePackages = "com.example.demo.filter")
public class DemoApplication {
@Bean方式:
新建配置类WebConfig.java,配置bean,在配置类中使用FilterRegistrationBean来配置过滤器,MyFilter2为实现了Filter接口的类,代码如下:
@Configuration
public class WebConfig {

    @Bean
    public FilterRegistrationBean testFilterRegistration() {
        FilterRegistrationBean registration = new FilterRegistrationBean(new MyFilter2());
        registration.addUrlPatterns("/test"); //
        registration.setName("myFilter2");
        return registration;
    }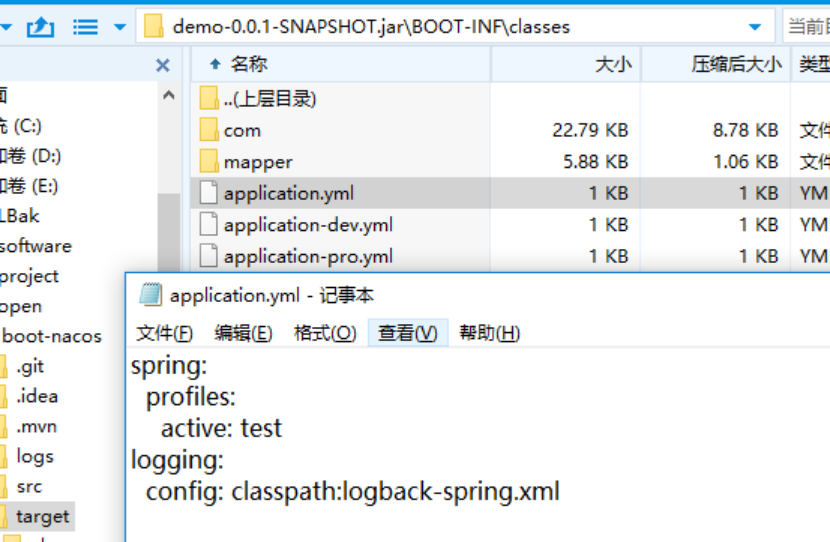
}[email protected]@ ,其实是配合 maven profile进行选择不同配置文件进行启动。
当执行
mvn clean package -P test 命令时, @profiles.active@ 会替换成 test
打开 jar包,即可看到:
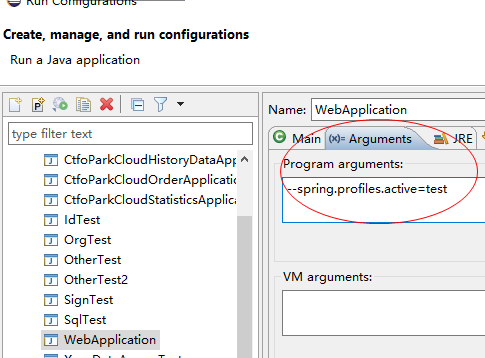
eclipse指定环境启动
右键启动类
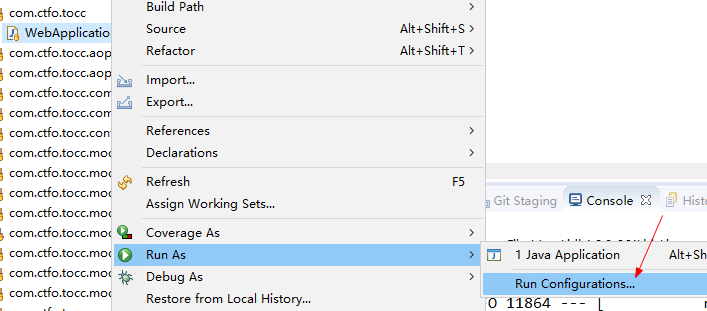
--spring.profiles.active =test
编写该接口的实现类并实现run方法,可以实现在springboot项目启动后执行run方法
实现CommandLineRunner接口,实现功能的代码放在实现的run方法中
# 如果有多个类实现CommandLineRunner接口,如何保证顺序
> SpringBoot在项目启动后会遍历所有实现CommandLineRunner的实体类并执行run方法,如果需要按照一定的顺序去执行,那么就需要在实体类上使用一个@Order注解(或者实现Order接口)来表明顺序
@Order(value=2)
按value值从小到大顺序执行
配置文件数据源配置:
spring:
  datasource:
    db1: # 数据源1
      jdbc-url: jdbc:mysql://localhost:3306/db1?characterEncoding=utf8&useUnicode=true&useSSL=false&serverTimezone=GMT%2B8
      username: root
      password: root
      driver-class-name: com.mysql.cj.jdbc.Driver
    db2: # 数据源2
      jdbc-url: jdbc:mysql://localhost:3306/db2?characterEncoding=utf8&useUnicode=true&useSSL=false&serverTimezone=GMT%2B8
      username: root
      password: root
      driver-class-name: com.mysql.cj.jdbc.Driver
注意:
各个版本的 springboot 配置 datasource 时参数有所变化,例如低版本配置数据库 url 时使用 url 属性,高版本使用 jdbc-url 属性,请注意区分。
数据源配置类
@Configuration
@MapperScan(basePackages = "com.example.multipledatasource.mapper.db1", sqlSessionFactoryRef = "db1SqlSessionFactory")
public class DataSourceConfig1 {

    @Primary // 表示这个数据源是默认数据源, 这个注解必须要加,因为不加的话spring将分不清楚那个为主数据源(默认数据源)
    @Bean("db1DataSource")
    @ConfigurationProperties(prefix = "spring.datasource.db1") //读取application.yml中的配置参数映射成为一个对象
    public DataSource getDb1DataSource(){
        return DataSourceBuilder.create().build();
    }

    @Primary
    @Bean("db1SqlSessionFactory")
    public SqlSessionFactory db1SqlSessionFactory(@Qualifier("db1DataSource") DataSource dataSource) throws Exception {
        SqlSessionFactoryBean bean = new SqlSessionFactoryBean();
        bean.setDataSource(dataSource);
        // mapper的xml形式文件位置必须要配置,不然将报错:no statement (这种错误也可能是mapper的xml中,namespace与项目的路径不一致导致)
        bean.setMapperLocations(new PathMatchingResourcePatternResolver().getResources("classpath*:mapping/db1/*.xml"));
        return bean.getObject();
    }

    @Primary
    @Bean("db1SqlSessionTemplate")
    public SqlSessionTemplate db1SqlSessionTemplate(@Qualifier("db1SqlSessionFactory") SqlSessionFactory sqlSessionFactory){
        return new SqlSessionTemplate(sqlSessionFactory);
    }
}
@Configuration
@MapperScan(basePackages = "com.example.multipledatasource.mapper.db2", sqlSessionFactoryRef = "db2SqlSessionFactory")
public class DataSourceConfig2 {
@Bean("db2DataSource")
@ConfigurationProperties(prefix = "spring.datasource.db2")
public DataSource getDb1DataSource(){
return DataSourceBuilder.create().build();
}
@Bean("db2SqlSessionFactory")
public SqlSessionFactory db1SqlSessionFactory(@Qualifier("db2DataSource") DataSource dataSource) throws Exception {
SqlSessionFactoryBean bean = new SqlSessionFactoryBean();
bean.setDataSource(dataSource);
bean.setMapperLocations(new PathMatchingResourcePatternResolver().getResources("classpath*:mapping/db2/*.xml"));
return bean.getObject();
}
@Bean("db2SqlSessionTemplate")
public SqlSessionTemplate db1SqlSessionTemplate(@Qualifier("db2SqlSessionFactory") SqlSessionFactory sqlSessionFactory){
return new SqlSessionTemplate(sqlSessionFactory);
}
}@Slf4j
@Configuration
@EnableScheduling // 开启定时任务
public class EventSourceTask {
@Autowired
private EventSourceService eventSourceService;
//添加定时任务,每5分钟执行一次
@Scheduled(cron = "0 */5 * * * ?")
//@Scheduled(fixedRate=5000)
private void configureTasks(){
eventSourceService.synData();
log.info("同步省厅消息数据完成");
}
}Cron表达式参数分别表示:
秒(0~59) 例如0/5表示每5秒
分(0~59)
时(0~23)
日(0~31)的某天,需计算
月(0~11)
周几( 可填1-7 或 SUN/MON/TUE/WED/THU/FRI/SAT)
// Cron表达式范例:
每隔5秒执行一次:*/5 * * * * ?
每隔1分钟执行一次:0 */1 * * * ?
每天23点执行一次:0 0 23 * * ?
每天凌晨1点执行一次:0 0 1 * * ?
每月1号凌晨1点执行一次:0 0 1 1 * ?
每月最后一天23点执行一次:0 0 23 L * ?
每周星期天凌晨1点实行一次:0 0 1 ? * L
在26分、29分、33分执行一次:0 26,29,33 * * * ?
每天的0点、13点、18点、21点都执行一次:0 0 0,13,18,21 * * ?
@PostMapping( "/get_invoice")
    public void get_invoice(HttpServletRequest request) {
        String authorization = request.getHeader("Authorization");
        log.info(authorization);
    }
@PostMapping(path = "/get_invoice2", name = "获取发票记录")
public void get_invoice2(@RequestHeader HttpHeaders headers , @RequestBody InvoiceQueryAO invoiceQueryAO) {
log.info(JSON.toJSONString(headers));
log.info(JSON.toJSONString(invoiceQueryAO));
}@GetMapping(path = "/get_invoice2", name = "获取发票记录")
public void get_invoice2(@RequestHeader HttpHeaders headers , InvoiceQueryAO invoiceQueryAO) {
log.info(JSON.toJSONString(headers));
log.info(JSON.toJSONString(invoiceQueryAO));
}get: 参数前添加@RequestParam(required = false)
post:参数前添加@RequestBody
我们在使用多线程的时候,往往需要创建Thread类,或者实现Runnable接口,如果要使用到线程池,我们还需要来创建Executors,在使用spring中,已经给我们做了很好的支持。
使用@EnableAsync来开启异步的支持。使用@Async就可以定义一个线程任务。通过spring给我们提供的ThreadPoolTaskExecutor就可以使用线程池。
@EnableAsync可以放在springboot的启动类上,也可以放在自定义线程池的配置类上
@Async注解来声明一个或多个异步任务,可以加在方法或者类上,加在类上表示这整个类的方法都异步执行,spring会从线程池中获取一个新的线程来执行方法,实现异步调用。没有自定义线程池@Async默认的线程池是SimpleAsyncTaskExecutor
自定义线程池来使用@Async
在配置类上通过@Bean指定name属性来定义多个线程池
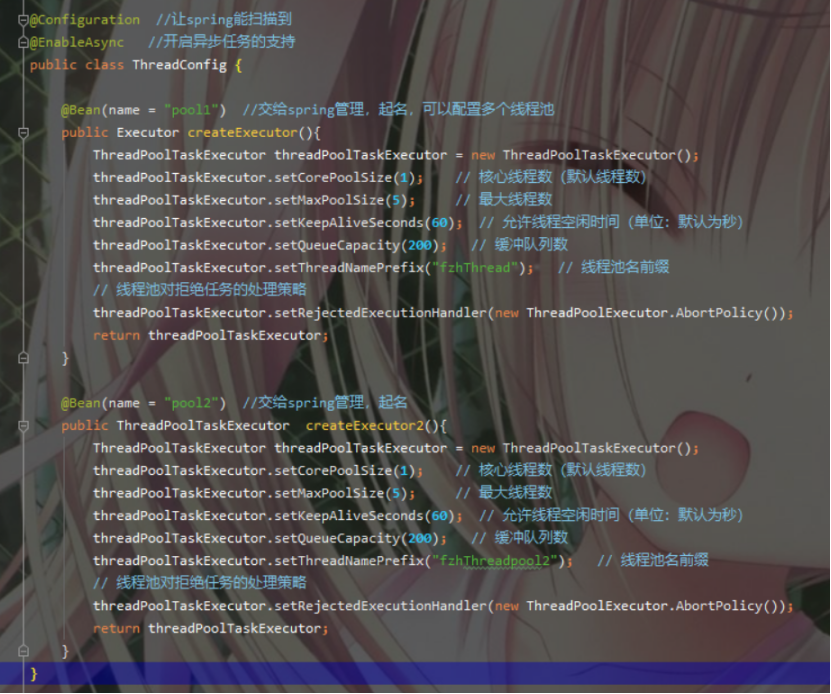
可以用@Async("name"),那么表示线程池的@Bean的name,来指定用哪个线程池处理
假如只配置了一个线程池,直接用@Async就会用自定义的线程池执行
假如配置了多个线程池,用@Async没指定用哪个线程池,会用默认的SimpleAsyncTaskExecutor来处理
首先需要依赖Springboot访问静态资源的Jar文件
<dependency>
    <groupId>org.springframework.boot</groupId>
    <artifactId>spring-boot-starter-thymeleaf</artifactId>
</dependency>
还需要在“resources”目录下(注意只能在“resources”目录下创建文件,因为SpringBoot只在它下面扫描),再创建一个文件夹名为“static”的文件夹,这里面存放的就是你的静态文件(可以在static下创建文件夹再创建静态文件)
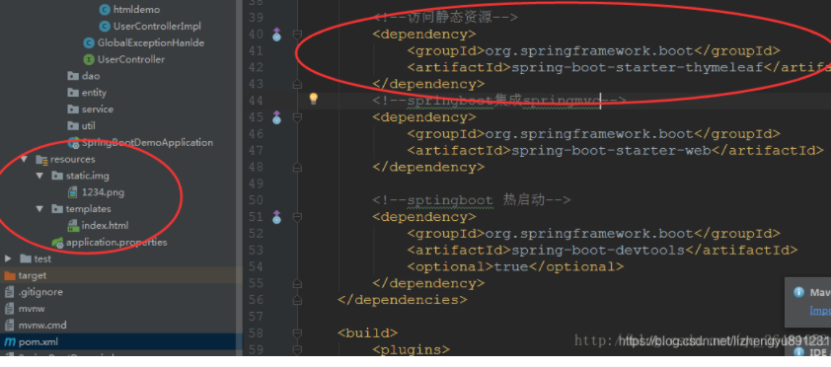
启动主程序,就可以直接访问了 这是我的URL:localhost:8080/img/1234.png
为了方便开发,Springboot启动的时候默认启动了一个服务:LiveReload
thymeleaf模板引擎默认开启了静态文件缓存,加快了访问速度,国外有LiveReload这个东西监听资源文件,可以实时更新了以后reload项目,显示在页面上,
但是国内没有啊,更新的静态文件就被thymeleaf缓存了,除非完全重启项目才能把项目缓存释放,否则就一直在缓存里面,就造成了不更新的现象了.
在开发中可能会有这样的情景。需要在容器启动的时候执行一些内容。比如读取配置文件,数据库连接之类的。SpringBoot给我们提供了两个接口来帮助我们实现这种需求。这两个接口分别为CommandLineRunner和ApplicationRunner。他们的执行时机为容器启动完成的时候。
这两个接口中有一个run方法,我们只需要实现这个方法即可。这两个接口的不同之处在于:ApplicationRunner中run方法的参数为ApplicationArguments,而CommandLineRunner接口中run方法的参数为String数组。
通过ApplicationArguments可以获取到SpringApplication.run(…)传输过来的arguments
springboot的启动类就用到了SpringApplication.run方法
public static void main(String[] args) {

        SpringApplication.run(XX.class, args);

}把User放入Redis,对从Redis中取出User对象时出现ClassCastException
解决办法:
POM文件删除spring-boot-devtools引用
<!--<dependency>-->
    <!--<groupId>org.springframework.boot</groupId>-->
    <!--<artifactId>spring-boot-devtools</artifactId>-->
    <!--<optional>true</optional>-->
<!--</dependency>-->
原因:
Springboot为了实现代码热部署破坏了双亲委派模型,导致User的类加载器由AppClassLoader变了Springboot的自定义加载器RestartClassLoader。只有类全称相同且类加载器相同,JVM才认为类是相同的。
整合redis报No qualifying bean of type 'org.springframework.data.redis.core.RedisTemplate<java.lang.String, java.lang.Object>异常
解决方法
1、不指定泛型,如
@Autowired
private RedisTemplate redisTemplate;
2、使用@Resource注解代替@Autowired,如
@Resource
private RedisTemplate<String, Object> redisTemplate;
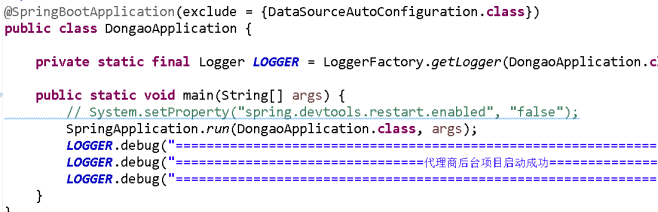
如果项目不需要连接数据库,没有配置数据库连接,默认启动项目会报错,可以做如下处理,来避免报错
启动类上:
@SpringBootApplication(exclude = DataSourceAutoConfiguration.class)